When I started this blog, I named it after the two kids in my life that inspire me... However, that leaves out the little girl coming soon! Since something like the blog title not including everyone will really bother me, I'm moving to a new one that will be more general! May sound silly, but hey, whatever makes mama happy! So, hop over to Kozy Knit to see more of what I'm up to!
November 11, 2011
November 2, 2011
My Big Project
Since September I have been working on a pretty serious project! Driven mainly by my lack of maternity wear and not being able to find a pattern I liked on Ravelry, I decided to design my own sweater! I've done modifications to baby sweaters and hats before, but I feel like this is my first real try with such a big project.

I think I'm going to call it the 'Mama Au Lait' sweater. It's the scrumptious color of a 'coffee with milk', which is pretty much all my hubby and I drink. Also, my plan is for it to be a perfect draping cover while nursing this winter after my baby is born. My sense of humor isn't the greatest, but I do enjoy playing with words!

Here is the sweater so far... The sides hang for 26 inches, with an increase to wrap around longer in the back. I'm on the decrease now (Yay! Feels like a small victory!) and just need to finish the left side and then add sleeves. There is a cable at the bottom and a cable pattern that travels along the top too. I love the way it will look around the neck.

You can see the increase below... and let me tell you, this was a huge challenge for me! What I love about each project is the new skills that are learned while figuring things out! I had to do some tests, making 1 right or left and which should be on which side... then how to make the decreases match... on and on... fun knitting stuff!

Although I've gotten sidetracked by knitting a new hat and making birthday stuff for my girly girl, I'm hoping to spend some good hours finishing this sweater. With only 7(!) weeks left of pregnancy, I'd better get a move on!
November 1, 2011
Superhero Necessities
I've already shared the muscle shirt I made William for his Batman costume.

But that's not all a superhero needs! Here are some of the details that made his costume really fun:

I freehanded the shape of the mask, making sure the ears would be tall enough. It took me several attempts to finally get a look that was batty enough! I cut out two copies and sewed them together with elastic to wrap around. Will wore it up on his head most of the time anyway.
I must say, the 'POW' is my favorite part of the whole costume! It gives such a bright pop of color against the Dark Knight, and instantly reminds me of the old Batman shows with Adam West. (Which you can watch here! - Batman on HUB) Again, felt shapes that I cut out and glued together. It is safety pinned to black mittens, but you could also use a strap of elastic or something. I can't wait for Will to use it again at Newark's Annual Comic Book Day!
He's the coolest Batman I know!!!!
 |
| (Reversible cape from Cracker Barrel) |
Although I had a lot of fun working on William's costume this year, I was quite relieved Aevyn already had everything she needed to dress as a bride!

As a professional flower girl (3 times!), she was able to use an old dress, some pretty satin gloves, and a blusher veil. She walked with her dance studio in the Newark Halloween Parade on the 30th. Definitely a cool experience! (And check out her handsome groom!)
Fun times, fun times... and next year we'll have three little costumes to plan!
October 30, 2011
White Pumpkins
I don't decorate much for Halloween... I can't stand black and orange together and creepy definitely isn't my thing! However, I've always loved white pumpkins. I think they are the perfect way to be spirited around Halloween, yet they are elegant enough for the rest of the season.
I decided to make a few small white pumpkins to add little touches of autumn through my house.
I bought these pumpkins from Walmart for less than 5 dollars,


The kids each painted a pumpkin too. William's had a face, but he was a little heavy with the paint, and it all dripped together.
Aevyn got pretty creative and detailed on the back of hers!
I decided to make a few small white pumpkins to add little touches of autumn through my house.
I bought these pumpkins from Walmart for less than 5 dollars,

and then painted them with white acrylic paint.

After a few coats had dried, I used silver to add designs.


The kids each painted a pumpkin too. William's had a face, but he was a little heavy with the paint, and it all dripped together.
Aevyn got pretty creative and detailed on the back of hers!
What kind of decorations do you put up for the fall season?
October 25, 2011
Nanananananananana......
BATMAN!!!

Yes, that's who we have for Halloween!
Since William is obsessed with superheroes, and already had a Batman cape, this seemed like the perfect costume this year. I bought a few pieces of black clothing, and figured out how to do my best for a costume the boy would be proud of.


And check out those muscles! I had other pictures for a how-to, but something weird is going on with them! It's simple though, here are the steps:
1. Buy two black shirts.
2. Put them one in the other.
3. Draw (with white crayon) where you want your pecs and six pack to be!
4. Print and cut a freezer paper stencil to use for the bat symbol.
5. Machine sew the muscle marks, leaving the outsides open for stuffing.
6. Iron and paint your stencil.
7. Heat set, wash, and dry your shirts.
8. Stuff and then sew the outsides.
I'll show the costume in full glory after Halloween! There are a few other fun details, but they need a little finishing. Fortunately, Aev is dressing up as a bride, and she already has everything needed for that! Easy! What are your kids dressing up as?
October 24, 2011
32 Weeks
Time has been cruising right along, and I only have 2 months left until baby girl is due!
Here are some pics we took tonight, using the iPad as a prop.


There is an app for the iPad called Hello Baby by Pampers, and it shows the fetal development for each week. It also gives an actual size image of what the baby looks like. We've never been very good at taking monthly pictures during pregnancy (in fact, this is our first photo ever taken intentionally showing pregnancy!), but I think this would be a really fun way to chart the growth of baby and mama.
It's amazing to think that is what the baby looks like inside of me right now!
October 12, 2011
Twirl Skirt Revisited
When Aevyn started ballet up again this fall, we realized we'd lost her skirt sometime during the summer. She had used the Girly Skirt I made last year for ballet a few times, so I thought I'd just make a new circle skirt for this year. Again I used the tutorial from MADE.

I decided to use a black dance fabric, which was great because I didn't have to finish edges. I wanted to use some teal and pink details because those are the colors of Aevyn's studio, Abundance Academy of Dance. I knew my friend, Kate, had a stash of awesome teal elastic, and she generously donated some for me to use!

My little ballerina loves it! She likes to have the bow in the front or on the side, but I love it as a fun surprise in the back. With her hair up in a bun, her neck and shoulders are just adorable!

Shared at:

October 10, 2011
Break Time!
After taking out 22 rows of knitting today, and realizing that I missed one cable and thus need to take out another 4 rows..... it's time to take a break!
I think when I'm working on a pattern that requires a lot of attention, I need something on the side to break it up. Something simple, something gratifying, something small. Something for a baby!
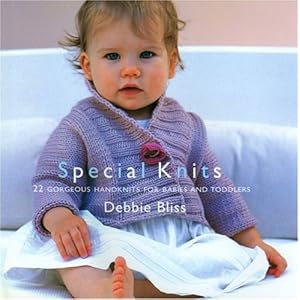
I've browsed several books for baby ideas, and the Ribbed Baby Jacket by Debbie Bliss is one of the ONLY sweaters that has really jumped out at me as cute and practical for a newborn. I even picked out lavender yarn for the project, it just looks so sweet! I'm using yarn from the new Martha Stewart craft line that Joann's is carrying. It's an acrylic and wool blend, super soft, and has a light sheen that gives the stitches a really defined look. So excited!
P.S. I'll post about the frustrating project mentioned at the top at some point. I'm working on a drapey sweater perfect for pregnant and nursing mamas. Only problem is that I'm making it up as I go along, so it's a bit more involved than I'd planned! I really do love it, but my brain needs a breather!
September 30, 2011
Post Wedding... Wedding Post!
Last weekend was my beautiful sister's wedding!
Everything went perfectly well, and although it had rained the whole day before, guests were still able to enjoy the outdoors and amazing views.
 |
| Laura and Tom Rice Photo by Dan Koczera |
The wedding was in Port Deposit, MD at the Donaldson Brown Center, a mansion built around 1935, overlooking the Susquehanna River.
Doesn't my sister look gorgeous? The veil was exactly what she wanted and I loved catching glimpses of the sunlight shining through it. She truly glowed the whole night!
 |
| My crazy little wedding goers, otherwise known as the ring bearer and flower girl! |
 |
| Father-daughter dance (and a view of the veil from the back) |
 |
| Watching the bride |
The kids were great in their roles, and William even carried the rings in his pocket! Aevyn danced the night away with everyone she could coerce out to the dance floor. My dad was her 'best partner' and she said "I didn't think Pop would be able to dance so much!" That, after 2 hours... we didn't think she could dance that long!
After four months of lots of wedding planning, it was such a beautiful and relaxing weekend.
Now, however, I fully intend to spend my mornings knitting and relaxing before out next big event... BABY!
September 26, 2011
A Little Organization
For quite some time I've been wanting to organize my knitting needles. I've kept them in a plastic bag, or a basket, or stuck into whatever random project I have lying around. They sell cases at Joann's or any other knitting supply shop, but $15 or more? Sorry! I'd rather buy yarn!
After perusing the tutorials floating around, I combined some and came up with a knitting needle roll that would work for me!

Layer as follows:
Back damask (facing down)- 19"tall by 21"wide
Felt- 12" by 21"
Damask lining (on top of felt)- 12" by 21"
Striped canvas pocket- 9" by 21"
(The felt is optional, but I wanted a little more bulk to the roll.)

Use bias tape to finish the edges of the two pockets.
Now would also be a good time to sew your lines in for the needle pockets. (For some reason I waited until the end! It's good to have others make the mistakes for you!) I did mine about 2 inches apart, for a total of 10 pockets. If you use a lot of big needles, 3 might be better, but you will have to adjust the size of your roll or have fewer pockets.

*I sewed two ribbons on the back of my roll while I was doing the pocket lines. I put mine right in the middle and only sewed it in one spot, but you could try various ways.


Have any other organizational tips or ideas?
*There's a good tutorial at Made by Loulabelle, but the one I mainly referenced is over at Design Sponge.
September 22, 2011
Cropped Sweater Details
I thought I would share a little of my process from the Cropped Sweater. The pattern came from Bergere de France Tricot Kid 512. I decided to do a size 8 for Aevyn. She'll be 7 this fall, so I wanted to make sure she would be able to wear it for a long time!

I used Deborah Norville Serenity yarn, and I loved it. I will say that it unravels a bit, but that's only after frogging... multiple times. Which I did!!! I view it all as good practice, and the more you take out, the faster you become at it!
The pattern used two strands of their yarn on size 8 and 9 needles. I only used one strand and after testing gauge, used size 10 and 11 needles.

Here you can see one whole sleeve and the beginning of the body. I love how it was worked across in one piece like this. I actually took it back a few rows after this picture because I didn't think the body was right. It seemed so short, so I added a few stitches to the moss pattern on each side (I think 6 or 8). I'm sure it would have been fine otherwise, but I like that it adds a little more weight to the bottom half.

The front and back are worked separately while the other half is on a stitch marker. This forms the neck and then they join again for the rest of the body and other sleeve.

The neck is picked up and knit in double rib, and then all that's left is to sew the sleeves and sides together.

Aevyn has already worn the sweater three times, and one of them was for picture day at school. I am so happy that she loves it! It makes each stitch worth the effort.
Thanks for reading!
September 20, 2011
My Favorite Fall Colors!
I've been following Celebrate Color, which is hosted by a few fabulous bloggers this fall. Very inspiring for bright, cozy projects to beat the rainy days we've been having here! And not limiting autumn to orange and black, my favorite fall colors are red and purple!
Here are some pictures I took at Longwood Gardens in Kennett Square, PA. Longwood belonged to Pierre S. du Pont, who built magnificent gardens, fountains, and a Conservatory, all with the best ingenuity of his time. I grew up often visiting the gardens with my parents and my best friends family. It is now our go-to place for inspiration, relaxation, and beauty.

One thing I love about autumn is the bright pops of color that stand out against their darker contrasts. The purple plants provide that anchor for the reds to be so vibrant.

 |
| How cool are these peppers? |
So, to celebrate autumn this year, Aevyn will be wearing her new purple sweater!

We love it paired with bright red pants!

I just can't resist hugging her in this cozy sweater.

This was a project that I loved the whole process of. It had just the right amount of challenge to keep from being boring, while not crossing over into discouraging. I did have to call on Kate (my personal expert) several times, as I'm still getting the hang of reading patterns. But knitting is always more fun with others!


Today is another rainy day here on the East Coast, so head over and check out all the beautiful images and projects at Celebrate Color!


Today is another rainy day here on the East Coast, so head over and check out all the beautiful images and projects at Celebrate Color!

September 14, 2011
Stitch by Stitch
I have a lot of projects going on right now....
Captain America is definitely on the back burner.
Aev's sweater is almost finished.

I've been wanting to make a knitting needle case for the longest time, and that is about half finished.
But, what I've been working on lately (and must have finished by the 24th) is my sister's wedding veil.
After looking at veils, she didn't like the prices, and she asked me to make it. Ok, I'm always up for something new! How hard can it be? Well, now that I am hand-stitching satin ribbon all along this poufy, 36" long veil, I totally understand why they are 70 dollars! I tried it with the machine, but it just wasn't gentle enough, and threads of the ribbon kept getting snagged.
However, as I am sewing, stitch by stitch, I'm trying to remember that some things take time.... and patience. I've spent some of the stitching time praying for my husband. I've always wanted to get into this habit, but I've not been very devoted in the past. The last few weeks I've decided to change that. This has been a great way to get my focus off the little things that irritate me, and onto the man that God created. I've found new things to thank God for, and I've been more sensitive to what may be stress factors that affect my husband. One thing is for sure... if you want to change your attitude about something or someone, start looking at them from God's perspective. Any situations or people you need to start praying for?
September 7, 2011
Off to School
My little boy started preschool this morning!

After being my sweet companion every day of the past 4 1/2 years, he is growing up! Ok, I'm being a bit dramatic. I got to stay today, and it's only 2 1/2 hours, 3 days a week. But still! Good thing we're having a new baby!
He actually didn't want to start school for the longest time. He told me he wanted ME to be his teacher. Uhhh..... no. But, superheroes fix everything! Here is the backpack that made William sooo excited to start preschool!

I didn't like how all the bags in the stores had images of the heroes looking so intense and mean! Since William hasn't actually seen any of the movies, he makes up the stories himself. But he knows all the symbols, so that's what we wanted. When you can't find what you want, make it!
I printed out the logos, cut out certain areas, and then traced the image onto the backpack with a white pencil. I thought the freezer paper would iron on for a nice stencil (note the white marks from where I tried this), but it didn't stick. I used Tulip fabric paints and for an afternoon or two of work, it's pretty cool! William got to watch the process and he's obsessed with his backpack.

Happy Preschool, little boy!

Yeah.... you.
Subscribe to:
Posts (Atom)